On the Appalachian Trail, 58% of hikers reported knee pain in 2017. It is one of the most common areas for hikers to experience pain, but why? In an earlier post on overpronation, we looked at how a flat arch can cause problems farther up the body and the knee is often the target.
Anatomy For Hikers
The knee is basically a hinge joint, operated by the quads in the front and the three hamstrings and two main calf muscles in the back. Simply, the quads work to straighten the leg, the hamstrings and calf work to bend it.
Quad Group
Looking at the right image, you’ll see the powerful quad muscles converge into a single tendon, the patellar tendon. Also note how the Iliotibial band ties into that same patellar tendon.
 Floating inside that tendon is the patella, or kneecap. Each of the four quad muscles has a more specific role when it comes to the knee cap.
Note the muscle fiber lines, they tell us which way the muscle is pulling on the kneecap, and as a team, they work to keep the kneecap in a handy grove provided by your femur.
When the quads muscles are not balanced, the kneecap is no longer gliding in middle of the grove; it gets pulled to the outside of the knee, typically. That means you will probably feel pain behind your kneecap.
If you hear a grinding noise when you squat or use stairs, it’s that excess pressure grinding the cartilage behind your knee cap caused by unequal pulling of the quads.
Not ideal.
The fix for that tension is deep, intense massage followed by strength training to even out the quad imbalance.
Step up to the barbell, my friends! This is known as the “quad smash”, essentially rolling out your quads with a barbell. Before you dismiss this idea, recognize that an empty barbell is only about 22lbs of pressure over your muscles, which is just the ticket to ease the muscle tension on the kneecap.
I use this technique with most of my patients and clients who have knee pain with great success. They hate doing it, but love how it feels when they are done. Trust me on this one!
Free Download: Self Care Guide For Hikers
Enter The Quad Smash
Place a rolled up hand towel under your knee for support. Starting at the knee, place the fat end of the barbell on your leg. The barbell should hang over the inside edge of your leg a few inches, which will be your handle for rolling and adjusting pressure.
Roll the barbell slowly up the leg. You are looking for areas that are intense and maybe take your breath away a little.  That’s where the problem lies. Once you find an intense spot, let the barbell sit on it. Keep breathing and relax the muscle as best you can. If it’s too intense, try the areas just above and below the intense area.
Spend about 10 minutes per leg, 3-4 times per week for best results.
If it’s simply too intense, lift up slightly on the barbell to take a little pressure off. Breathe deep belly breaths!
The muscle may also shake and quiver, that’s just fine. Let the barbell sit on that spot until the quivering subsides.
You’re probably thinking that you can’t lug a 45lb barbell around while hiking, and you’d be correct. That’s a bad idea. The video shows more trail friendly versions.
Hamstrings
Looking at the muscles behind the knee, you will see the three hamstring muscles up top (Semimambranosus, Semitendinosus and Biceps Femoris) and the main calf muscle, Gastrocnemius, below. Deeper yet, you will find the Popliteus muscle which helps to “lock” your knee.
If the muscles on the front or back of the leg are tight, they basically compress your knee, which is going to cause discomfort.
 Since hamstring tightness can be much more than just needing a stretch, it’s important to discuss a few things before we dive into stretching. This may not apply to most younger thru-hikers, but rather the more “life experienced” hikers.
If your glute (butt) muscles and your core are weak, your hamstrings are going to be given the additional task of stabilizing the hips. This will also affect your low back, significantly. Aside from the other jobs that the hamstrings have, they are now being asked to engage pretty much all of the time, making them feel tight. Simply put, this is more than just tight hamstrings.
This is a neuromuscular problem that needs a different approach. Stretching may actually increase whatever pain/discomfort you are having.
Stretching won’t necessarily work because the signal from the brain says to stay engaged and protect the hips, and low back. If you are having back pain and can’t touch your toes, you need a more refined approach to stretch and correct imbalances. Seek out a physical therapist or personal trainer who can assess you before proceeding.
If you feel like you have tight hamstrings and no other problems, let’s proceed.
The Stretches

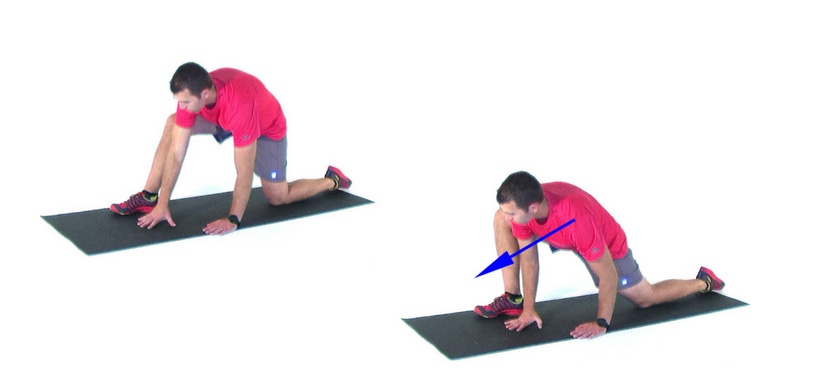
This stretch can easily be done against a tree while hiking. At home, simply elevate one leg in a doorway or on a wall. Slide towards the wall or doorway until you feel a stretch. Relax into the stretch.. In the image, his opposite leg is bent, this can be more comfortable for the back; it could also be straight without changing the effectiveness. See what is more comfortable for you.
Spend minutes relaxing into the stretch this is best done at the end of the day.
Adductor Stretch

This stretch targets the hamstrings up toward the hips, where they all attach along with the adductors or groin muscles. You can also gently press outward on the knee using your elbow during the stretch to get more of a groin stretch.
Calf Muscles

There are two heads to your main calf muscle, the Gastrocnemius (Gastroc). On the back of your femur there are knuckles where each Gastroc head attaches. Deep to the two-headed muscle is the Soleus. Along with the Gastroc, they form your Achilles tendon, which attaches to your heel bone.
The Gastroc head that attaches to the “inside” knuckle will often be pretty tender with deep massage. The outside head can also be tender, often more toward the bottom end along the outside.
To massage this, take your trekking pole and glide it over the back of your leg, or use a fist. I find with this muscle, a broad, deep pressure can be more tolerable than just jamming a couple of fingers into the muscle. That being said, pressing a thumb into a painful spot until it is less painful is a decent tactic for knots you encounter.
Muscles also tend to be more tender where the tendon begins to emerge. In the image above, you can easily identify where red muscle ends and the white begins. This is a nerve-rich area and can be pretty unpleasant to mess with. The fact it’s unpleasant should clue you in that it needs some TLC!
Recall that the calf is the common factor the tendonitis issues that can plague hikers. The calf is one area you should not overlook!
Enter the Bone Saw
It sounds pleasant, but it’s not. The version in the video is basically showing you how to press into your lower calf using your opposite shin. It’s a very deep massage, but you get to control how much pressure is being applied.
To enhance the effectiveness of this method, place a larger bolster under the ankle. This will elevate your foot allowing you to move your foot up and down. This foot movement while the pressure of you shin placed on your calf will really enhance the effectiveness of this technique.
The Soleus
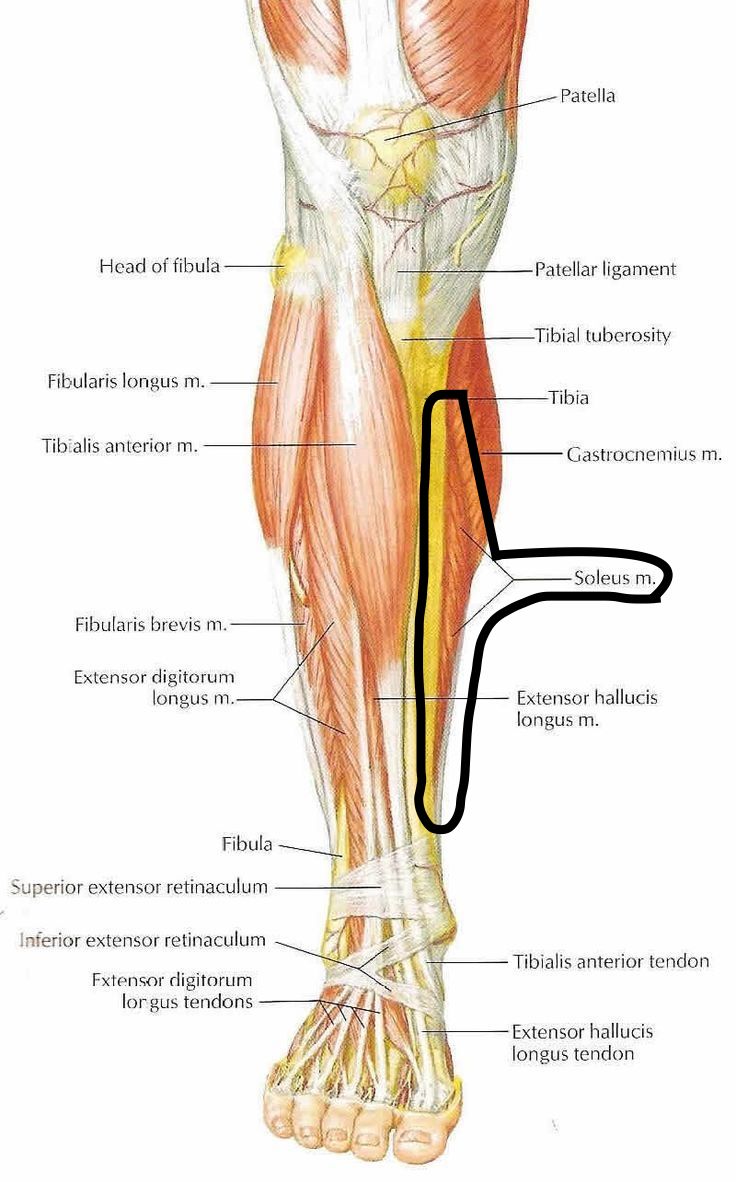
Since this muscle is deeper to the Gastroc, it’s a little trickier to target with massage. You’ll find a narrow edge of this muscle along the inside edge of the Tibia (shin bone) that you can target with massage.
It is usually quite tender and very neglected since it is so deep. Use your fingers, a lacrosse ball or trekking pole handle to sneak along the edge of the muscle for massage.
Spend a few minutes massaging the muscle per day for best results. It will start to feel better the more you massage it, just be patient. Â The bone saw also helps get deep enough to target the Soleus.
Meniscus, Ligaments, Fat Pads and Bursa
Meniscus
The meniscus is jelly-like shock absorber for the knee. It actually shares connective tissue with the Anterior Cruciate Ligament (ACL) and the Medial Collateral Ligament (MCL). If either of those ligaments is damaged, often the meniscus will suffer some injury as well.
If the meniscus is injured it can take a very long time to heal, if at all. There are three zones to the meniscus that vary in how blood rich they are. Zones with more blood flow offer a better chance of healing; zones with less blood flow little to no healing at all.
Pain is usually deep, and it can be sharp or more diffuse; you may feel a catch or a even a flap inside your knee with certain movements. Swelling is usually present and the joint will also feel warm to the touch. All things you would want to visit a doctor for.
Ligaments
If damage occurs to these structures likely you’ll know about it pretty quickly. Pain, swelling, and loss of stability for the knee will be hard to miss. It can happen from a fall, but also non-contact injuries can occur.
Fat Pads and Bursa
These structures help to pad the knee and provide a buffer to the tendons and ligaments against the bones. They can also become inflamed from the increased tension that comes from the quads or other muscle imbalances creating strain across these structures.
With the meniscus, ligaments and inflamed bursa or fat pads, you will want to stop hiking and seek a medical provider.
Be sure to like our Facebook page and follow us on Instagram and Twitter!
You can reach me info@trailsidefitness.com with any injury issues, past or present that you feel will impact your hike. Training questions are also welcome – I am happy to help!


Recent Comments